On Premise
Prerequisites
Kubernetes 1.21+ : https://kubernetes.io/docs/setup/
Kubectl command-line tool : https://kubernetes.io/docs/tasks/tools/
Helm 3.11.0+ : https://helm.sh/docs/intro/install/
Nginx Ingress Controller : https://kubernetes.github.io/ingress-nginx/deploy/
Install Cloudforet
It guides you on how to install Cloudforet using Helm chart. Related information is also available at: https://github.com/cloudforet-io/charts
1. Add Helm Repository
helm repo add cloudforet https://cloudforet-io.github.io/charts
helm repo update
helm search repo
2. Create Namespaces
kubectl create ns spaceone
kubectl create ns spaceone-plugin
Cautions of creation namespace
If you need to use only one namespace, you do not need to create thespaceone-pluginnamespace.
If changing the Cloudforet namespace, please refer to the following link. Change K8S Namespace
3. Create Role and RoleBinding
In a general situation where namespaces are not merged, supervisor distributes plugins from spaceone namespace to spaceone-plugin namespace, so roles and rolebindings are required as follows. Check the contents at the following link. https://github.com/cloudforet-io/charts/blob/master/examples/rbac.yaml
Details of the authority are as follows. You can edit the file to specify permissions if needed.
Create file
cat <<EOF> rbac.yaml
---
apiVersion: rbac.authorization.k8s.io/v1
kind: Role
metadata:
  name: supervisor-plugin-control-role
  namespace: spaceone-plugin
rules:
- apiGroups:
  - "*"
  resources:
  - replicaSets
  - pods
  - deployments
  - services
  - endpoints
  verbs:
  - get
  - list
  - watch
  - create
  - delete
---
apiVersion: rbac.authorization.k8s.io/v1
kind: RoleBinding
metadata:
  name: supervisor-role-binding
  namespace: spaceone-plugin
roleRef:
  apiGroup: rbac.authorization.k8s.io
  kind: Role
  name: supervisor-plugin-control-role
subjects:
- kind: ServiceAccount
  name: default
  namespace: spaceone
EOF
To apply the permission, you can reflect it with the command below. If you have changed the namespace, enter the changed namespace. (Be careful with the namespace.)
kubectl apply -f rbac.yaml -n spaceone-plugin
4. Install
Proceed with the installation using the helm command below.
helm install cloudforet cloudforet/spaceone -n spaceone
After entering the command, you can see that pods are uploaded in the spaceone namespace as shown below.
kubectl get pod -n spaceone

NAME                                       READY   STATUS             RESTARTS      AGE
board-64f468ccd6-v8wx4                     1/1     Running            0             4m16s
config-6748dc8cf9-4rbz7                    1/1     Running            0             4m14s
console-767d787489-wmhvp                   1/1     Running            0             4m15s
console-api-846867dc59-rst4k               2/2     Running            0             4m16s
console-api-v2-rest-79f8f6fb59-7zcb2       2/2     Running            0             4m16s
cost-analysis-5654566c95-rlpkz             1/1     Running            0             4m13s
cost-analysis-scheduler-69d77598f7-hh8qt   0/1     CrashLoopBackOff   3 (39s ago)   4m13s
cost-analysis-worker-68755f48bf-6vkfv      1/1     Running            0             4m15s
cost-analysis-worker-68755f48bf-7sj5j      1/1     Running            0             4m15s
cost-analysis-worker-68755f48bf-fd65m      1/1     Running            0             4m16s
cost-analysis-worker-68755f48bf-k6r99      1/1     Running            0             4m15s
dashboard-68f65776df-8s4lr                 1/1     Running            0             4m12s
file-manager-5555876d89-slqwg              1/1     Running            0             4m16s
identity-6455d6f4b7-bwgf7                  1/1     Running            0             4m14s
inventory-fc6585898-kjmwx                  1/1     Running            0             4m13s
inventory-scheduler-6dd9f6787f-k9sff       0/1     CrashLoopBackOff   4 (21s ago)   4m15s
inventory-worker-7f6d479d88-59lxs          1/1     Running            0             4m12s
mongodb-6b78c74d49-vjxsf                   1/1     Running            0             4m14s
monitoring-77d9bd8955-hv6vp                1/1     Running            0             4m15s
monitoring-rest-75cd56bc4f-wfh2m           2/2     Running            0             4m16s
monitoring-scheduler-858d876884-b67tc      0/1     Error              3 (33s ago)   4m12s
monitoring-worker-66b875cf75-9gkg9         1/1     Running            0             4m12s
notification-659c66cd4d-hxnwz              1/1     Running            0             4m13s
notification-scheduler-6c9696f96-m9vlr     1/1     Running            0             4m14s
notification-worker-77865457c9-b4dl5       1/1     Running            0             4m16s
plugin-558f9c7b9-r6zw7                     1/1     Running            0             4m13s
plugin-scheduler-695b869bc-d9zch           0/1     Error              4 (59s ago)   4m15s
plugin-worker-5f674c49df-qldw9             1/1     Running            0             4m16s
redis-566869f55-zznmt                      1/1     Running            0             4m16s
repository-8659578dfd-wsl97                1/1     Running            0             4m14s
secret-69985cfb7f-ds52j                    1/1     Running            0             4m12s
statistics-98fc4c955-9xtbp                 1/1     Running            0             4m16s
statistics-scheduler-5b6646d666-jwhdw      0/1     CrashLoopBackOff   3 (27s ago)   4m13s
statistics-worker-5f9994d85d-ftpwf         1/1     Running            0             4m12s
supervisor-scheduler-74c84646f5-rw4zf      2/2     Running            0             4m16s
If some of the scheduler pods are having problems and the rest of the pods are up, you're in the right state for now. The scheduler problem requires an upgrade operation using the values.yaml file after issuing a token through the initializer.
5. Initialize the configuration
This is a task for Cloudforet's domain creation. A root domain is created and a root token is issued through the initializer.
spaceone-initializer can be found on the following cloudforet-io github site. https://github.com/cloudforet-io/spaceone-initializer
The initializer.yaml file to be used here can be found at the following link. https://github.com/cloudforet-io/charts/blob/master/examples/initializer.yaml
You can change the domain name, domain_owner.id/password, etc. in the initializer.yaml file.
Create file
cat <<EOF> filename.yaml
main:
    import:
        - /root/spacectl/apply/root_domain.yaml
        - /root/spacectl/apply/create_managed_repository.yaml
        - /root/spacectl/apply/user_domain.yaml
        - /root/spacectl/apply/create_role.yaml
        - /root/spacectl/apply/add_statistics_schedule.yaml
        - /root/spacectl/apply/print_api_key.yaml
    var:
        domain:
            root: root
            user: spaceone
        default_language: ko
        default_timezone: Asia/Seoul
        domain_owner:
            id: admin
            password: Admin123!@# # Change your password
        user:
            id: system_api_key
EOF
After editing the file, execute the initializer with the command below.
helm install initializer cloudforet/spaceone-initializer -n spaceone -f initializer.yaml
After execution, an initializer pod is created in the specified spaceone namespace and domain creation is performed. You can check the log when the pod is in Completed state.
6. Set the Helm Values and Upgrade the chart
To customize the default installed helm chart, the values.yaml file is required.
A typical example of a values.yaml file can be found at the following link. https://github.com/cloudforet-io/charts/blob/master/examples/values/all.yaml
To solve the scheduler problem, check the pod log in Completed status as shown below to obtain an admin token.
kubectl logs initializer-5f5b7b5cdc-abcd1 -n spaceone

(omit)
TASK [Print Admin API Key] *********************************************************************************************
"{TOKEN}"

FINISHED [ ok=23, skipped=0 ] ******************************************************************************************

FINISH SPACEONE INITIALIZE
Create a values.yaml file using the token value obtained from the initializer pod log. Inside the file, you can declare app settings, namespace changes, kubernetes options changes, etc.
The following describes how to configure the console domain in the values.yaml file and how to use the issued token as a global config.
console:
  production_json:
    # If you don't have a service domain, you refer to the following 'No Domain & IP Access' example.
    CONSOLE_API:
      ENDPOINT: https://console.api.example.com       # Change the endpoint
    CONSOLE_API_V2:
      ENDPOINT: https://console-v2.api.example.com    # Change the endpoint

global:
  shared_conf:
    TOKEN: '{TOKEN}'                                  # Change the system token
After setting the values.yaml file as above, execute the helm upgrade operation with the command below. After the upgrade is finished, delete all app instances related to cloudforet so that all pods are restarted.
helm upgrade cloudforet cloudforet/spaceone -n spaceone -f values.yaml
kubectl delete po -n spaceone -l app.kubernetes.io/instance=cloudforet
7. Check the status of the pods
Check the status of the pod with the following command. If all pods are in Running state, the installation is complete.
kubectl get pod -n spaceone
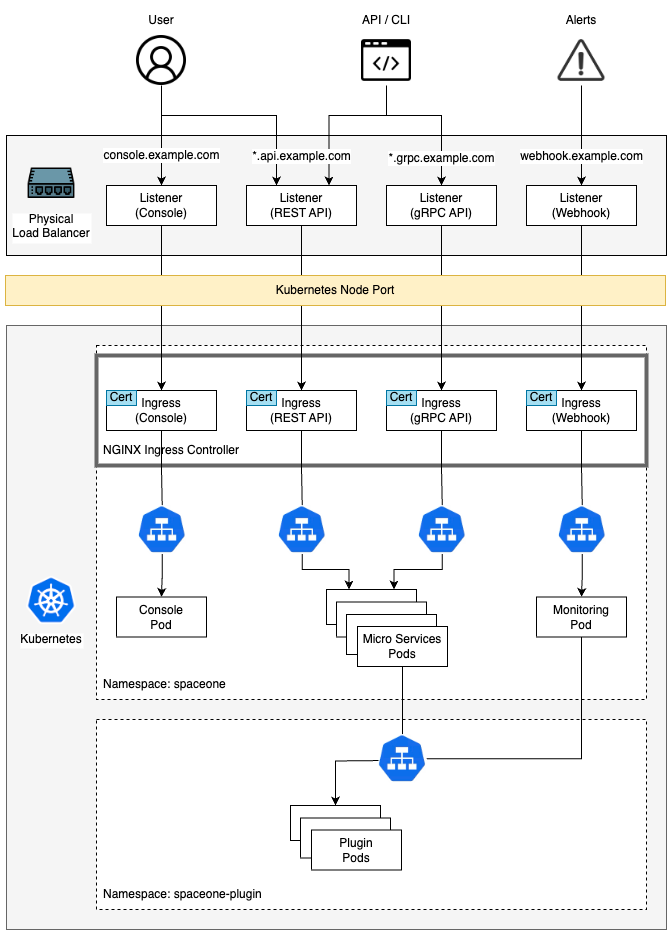
8. Configuration Ingress
Kubernetes Ingress is a resource that manages connections between services in a cluster and external connections. Cloudforet is serviced by registering the generated certificate as a secret and adding an ingress in the order below.
Install Nginx Ingress Controller
An ingress controller is required to use ingress in an on-premise environment. Here is a link to the installation guide for Nginx Ingress Controller supported by Kubernetes.
- Nginx Ingress Controller : https://kubernetes.github.io/ingress-nginx/deploy/
Generate self-managed SSL
Create a private ssl certificate using the openssl command below. (If an already issued certificate exists, you can create a Secret using the issued certificate. For detailed instructions, please refer to the following link. Create secret by exist cert)
console
- *.{domain}
openssl req -x509 -nodes -days 365 -newkey rsa:2048 -keyout console_ssl.pem -out console_ssl.csr -subj "/CN=*.{domain}/O=spaceone" -addext "subjectAltName = DNS:*.{domain}"
api
- *.api.{domain}
openssl req -x509 -nodes -days 365 -newkey rsa:2048 -keyout api_ssl.pem -out api_ssl.csr -subj "/CN=*.api.{domain}/O=spaceone" -addext "subjectAltName = DNS:*.api.{domain}"
Create secret for ssl
If the certificate is ready, create a secret using the certificate file.
kubectl create secret tls console-ssl --key console_ssl.pem --cert console_ssl.csr
kubectl create secret tls api-ssl --key api_ssl.pem --cert api_ssl.csr
Create Ingress
Prepare the two ingress files below. These ingress files can be downloaded from the following link.
console_ingress.yaml : https://github.com/cloudforet-io/charts/blob/master/examples/ingress/on_premise/console_ingress.yaml
rest_api_ingress.yaml : https://github.com/cloudforet-io/charts/blob/master/examples/ingress/on_premise/rest_api_ingress.yaml
Each file is as follows. Change the hostname inside the file to match the domain of the certificate you created.
console
cat <<EOF> console_ingress.yaml
---
apiVersion: networking.k8s.io/v1
kind: Ingress
metadata:
name: console-ingress
namespace: spaceone
spec:
ingressClassName: nginx
tls:
    - hosts:
        - "console.example.com"  # Change the hostname
    secretName: spaceone-tls
rules:
    - host: "console.example.com"  # Change the hostname
    http:
        paths:
        - path: /
            pathType: Prefix
            backend:
            service:
                name: console
                port:
                number: 80
EOF
rest_api
cat <<EOF> rest_api_ingress.yaml
---
apiVersion: networking.k8s.io/v1
kind: Ingress
metadata:
name: console-api-ingress
namespace: spaceone
spec:
ingressClassName: nginx
tls:
    - hosts:
        - "*.api.example.com"  # Change the hostname
    secretName: spaceone-tls
rules:
    - host: "console.api.example.com"  # Change the hostname
    http:
        paths:
        - path: /
            pathType: Prefix
            backend:
            service:
                name: console-api
                port:
                number: 80
---
apiVersion: networking.k8s.io/v1
kind: Ingress
metadata:
name: console-api-v2-ingress
namespace: spaceone
spec:
ingressClassName: nginx
tls:
    - hosts:
        - "*.api.example.com"  # Change the hostname
    secretName: spaceone-tls
rules:
    - host: "console-v2.api.example.com"  # Change the hostname
    http:
        paths:
        - path: /
            pathType: Prefix
            backend:
            service:
                name: console-api-v2-rest
                port:
                number: 80
EOF
Create the prepared ingress in the spaceone namespace with the command below.
kubectl apply -f console_ingress.yaml -n spaceone
kubectl apply -f rest_api_ingress.yaml -n spaceone
Connect to the Console
Connect to the Cloudforet Console service.
Advanced Configurations
Additional settings are required for the following special features. Below are examples and solutions for each situation.
| Name | Description |
|---|---|
| Set Plugin Certificate | This is how to set a certificate for each plugin when using a private certificate. |
| Support Private Image Registry | In an environment where communication with the outside is blocked for organization's security reasons, you can operate your own Private Image Registry. In this case, Container Image Sync operation is required, and Cloudforet suggests a method using the dregsy tool. |
| Change K8S Namespace | Namespace usage is limited by each environment, or you can use your own namespace name. Here is how to change Namespace in Cloudforet. |
| Set HTTP Proxy | In the on-premise environment with no Internet connection, proxy settings are required to communicate with the external world. Here's how to set up HTTP Proxy. |
| Set K8S ImagePullSecrets | If you are using Private Image Registry, you may need credentials because user authentication is set. In Kubernetes, you can use secrets to register credentials with pods. Here's how to set ImagePullSecrets. |