Getting Started
This is Getting Started Installation guide with minikube. Note :- This Guide is not for production, but for developer only.
Verified Environments
| Distro | Status | Link(ex. Blog) |
|---|---|---|
| Ubuntu 20.04 | Not Tested | |
| Ubuntu 22.04 | Verified | |
| Amazon Linux 2 | Not Tested | |
| Amazon Linux 2023 | Not Tested | |
| macOS (Apple Silicon, M1) | Verified | |
| macOS (Apple Silicon, M2) | Verified | |
| Windows | Verified | https://medium.com/@ayushsharma2267410/installation-of-cloudforet-in-windows-8c4a10c9a65f |
Overview
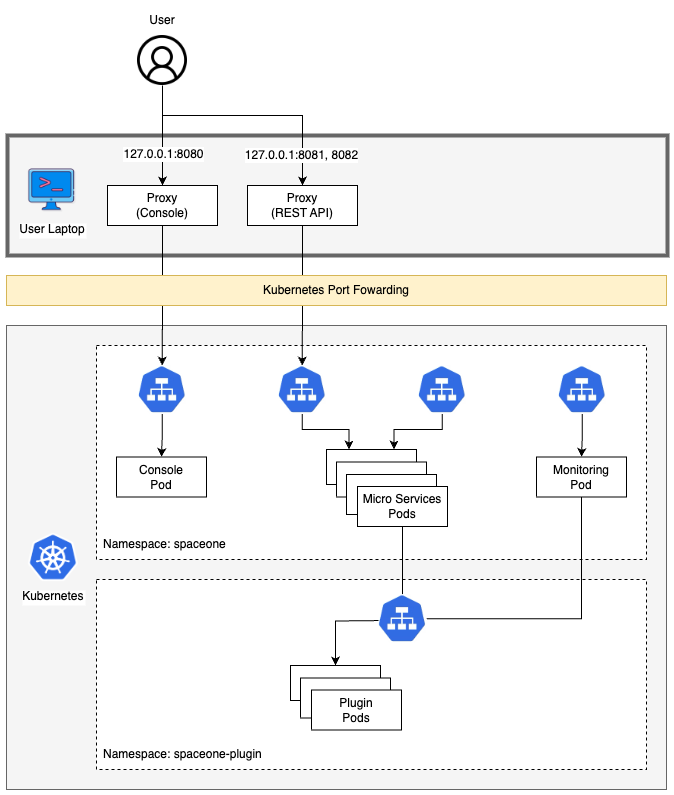
Cloudforet-Minikube Architecture
Prerequisites
- AWS EC2 VM (Intel/AMD/ARM CPU)
Recommended instance type: t3.medium (2 cores, 4 GB Memory, 30GB EBS)
- Docker/Docker Desktop
- If you don't have Docker installed, minikube will return an error as minikube uses docker as the driver.
- Highly recommend installing Docker Desktop based on your OS.
- Minikube
- Requires minimum Kubernetes version of 1.21+.
- Kubectl
- Helm
- Requires minimum Helm version of 3.11.0+.
- If you want to learn more about Helm, refer to this.
Before diving into the Cloudforet Installation process, start minikube by running the command below.
minikube start --driver=docker --memory=4096mb
If you encounter
Unable to resolve the current Docker CLI context "default"error, check if the docker daemon is running.
Installation
You can install the Cloudforet by the following the steps below.
1) Setting up Helm Chart Repository
This command adds Helm repository.
helm repo add cloudforet https://cloudforet-io.github.io/charts
This command updates repositories basd on latest version of chart repository.
helm repo update
This command list contents of the repository.
helm search repo
2) Create Namespaces
If you want to use only one namespace, you don't have to create the
spaceone-pluginnamespace.
kubectl create ns spaceone
kubectl create ns spaceone-plugin
3) Create Role and RoleBinding
First, download the rbac.yaml file.
The rbac.yaml file basically serves as a means to regulate access to computer or network resources based on the roles of individual users. For more information about RBAC Authorization in Kubernetes, refer to this.
If you are used to downloading files via command-line, run this command to download the file.
wget https://raw.githubusercontent.com/cloudforet-io/charts/master/examples/rbac.yaml -O rbac.yaml
Next, execute the following command.
kubectl apply -f rbac.yaml -n spaceone-plugin
4) Install Cloudforet Chart
This command basically let Helm search for the chart named cloudforet in the repository named spaceone. For more information about what chart is, refer to this.
helm install cloudforet cloudforet/spaceone -n spaceone --version 1.12.10
After executing the above command, check the status of the pod.
Scheduler pods are in
CrashLoopBackOfforErrorstate. This is because the setup is not complete.
kubectl get pod -n spaceone

NAME                                      READY   STATUS             RESTARTS      AGE
board-5746fd9657-vtd45                    1/1     Running            0             57s
config-5d4c4b7f58-z8k9q                   1/1     Running            0             58s
console-6b64cf66cb-q8v54                  1/1     Running            0             59s
console-api-7c95848cb8-sgt56              2/2     Running            0             58s
console-api-v2-rest-7d64bc85dd-987zn      2/2     Running            0             56s
cost-analysis-7b9d64b944-xw9qg            1/1     Running            0             59s
cost-analysis-scheduler-ff8cc758d-lfx4n   0/1     Error              3 (37s ago)   55s
cost-analysis-worker-559b4799b9-fxmxj     1/1     Running            0             58s
cost-analysis-worker-559b4799b9-nf5vs     1/1     Running            0             58s
cost-analysis-worker-559b4799b9-swzw8     1/1     Running            0             58s
cost-analysis-worker-559b4799b9-x8f4j     1/1     Running            0             58s
dashboard-b4cc996-mgwj9                   1/1     Running            0             56s
docs-5fb4cc56c7-68qbk                     1/1     Running            0             59s
identity-6fc984459d-zk8r9                 1/1     Running            0             56s
inventory-67498999d6-722bw                1/1     Running            0             57s
inventory-scheduler-5dc6856d44-4spvm      0/1     CrashLoopBackOff   3 (18s ago)   59s
inventory-worker-68d9fcf5fb-x6knb         1/1     Running            0             55s
marketplace-assets-8675d44557-ssm92       1/1     Running            0             59s
mongodb-7c9794854-cdmwj                   1/1     Running            0             59s
monitoring-fdd44bdbf-pcgln                1/1     Running            0             59s
notification-5b477f6c49-gzfl8             1/1     Running            0             59s
notification-scheduler-675696467-gn24j    1/1     Running            0             59s
notification-worker-d88bb6df6-pjtmn       1/1     Running            0             57s
plugin-556f7bc49b-qmwln                   1/1     Running            0             57s
plugin-scheduler-86c4c56d84-cmrmn         0/1     CrashLoopBackOff   3 (13s ago)   59s
plugin-worker-57986dfdd6-v9vqg            1/1     Running            0             58s
redis-75df77f7d4-lwvvw                    1/1     Running            0             59s
repository-5f5b7b5cdc-lnjkl               1/1     Running            0             57s
secret-77ffdf8c9d-48k46                   1/1     Running            0             55s
spacectl-5664788d5d-dtwpr                 1/1     Running            0             59s
statistics-67b77b6654-p9wcb               1/1     Running            0             56s
statistics-scheduler-586875947c-8zfqg     0/1     Error              3 (30s ago)   56s
statistics-worker-68d646fc7-knbdr         1/1     Running            0             58s
supervisor-scheduler-6744657cb6-tpf78     2/2     Running            0             59s
To execute the commands below, every POD except xxxx-scheduler-yyyy must have a Running status.
5) Initialize the Configuration
First, download the initializer.yaml file.
For more information about the initializer, please refer to the spaceone-initializer.
If you are used to downloading files via command-line, run this command to download the file.
wget https://raw.githubusercontent.com/cloudforet-io/charts/master/examples/initializer.yaml -O initializer.yaml
And execute the following command.
helm install initializer cloudforet/spaceone-initializer -n spaceone -f initializer.yaml
6) Set the Helm Values and Upgrade the Chart
Complete the initialization, you can get the system token from the initializer pod logs.
To figure out the pod name for the initializer, run this command first to show all pod names for namespace spaceone.
kubectl get pods -n spaceone
Then, among the pods shown copy the name of the pod that starts with initialize-spaceone.
NAME                                       READY   STATUS      RESTARTS   AGE
board-5997d5688-kq4tx                      1/1     Running     0          24m
config-5947d845b5-4ncvn                    1/1     Running     0          24m
console-7fcfddbd8b-lbk94                   1/1     Running     0          24m
console-api-599b86b699-2kl7l               2/2     Running     0          24m
console-api-v2-rest-cb886d687-d7n8t        2/2     Running     0          24m
cost-analysis-8658c96f8f-88bmh             1/1     Running     0          24m
cost-analysis-scheduler-67c9dc6599-k8lgx   1/1     Running     0          24m
cost-analysis-worker-6df98df444-5sjpm      1/1     Running     0          24m
cost-analysis-worker-6df98df444-77vm7      1/1     Running     0          24m
cost-analysis-worker-6df98df444-v7wtv      1/1     Running     0          24m
cost-analysis-worker-6df98df444-wsnw6      1/1     Running     0          24m
dashboard-84d8969d79-vqhr9                 1/1     Running     0          24m
docs-6b9479b5c4-jc2f8                      1/1     Running     0          24m
identity-6d7bbb678f-b5ptf                  1/1     Running     0          24m
initialize-spaceone-fsqen-74x7v            0/1     Completed   0          98m
inventory-64d6558bf9-v5ltj                 1/1     Running     0          24m
inventory-scheduler-69869cc5dc-k6fpg       1/1     Running     0          24m
inventory-worker-5649876687-zjxnn          1/1     Running     0          24m
marketplace-assets-5fcc55fb56-wj54m        1/1     Running     0          24m
mongodb-b7f445749-2sr68                    1/1     Running     0          101m
monitoring-799cdb8846-25w78                1/1     Running     0          24m
notification-c9988d548-gxw2c               1/1     Running     0          24m
notification-scheduler-7d4785fd88-j8zbn    1/1     Running     0          24m
notification-worker-586bc9987c-kdfn6       1/1     Running     0          24m
plugin-79976f5747-9snmh                    1/1     Running     0          24m
plugin-scheduler-584df5d649-cflrb          1/1     Running     0          24m
plugin-worker-58d5cdbff9-qk5cp             1/1     Running     0          24m
redis-b684c5bbc-528q9                      1/1     Running     0          24m
repository-64fc657d4f-cbr7v                1/1     Running     0          24m
secret-74578c99d5-rk55t                    1/1     Running     0          24m
spacectl-8cd55f46c-xw59j                   1/1     Running     0          24m
statistics-767d84bb8f-rrvrv                1/1     Running     0          24m
statistics-scheduler-65cc75fbfd-rsvz7      1/1     Running     0          24m
statistics-worker-7b6b7b9898-lmj7x         1/1     Running     0          24m
supervisor-scheduler-555d644969-95jxj      2/2     Running     0          24m
To execute the below kubectl logs command, the status of POD(Ex: here initialize-spaceone-fsqen-74x7v) should be Completed . Proceeding with this while the POD is INITIALIZING will give errors
Get the token by getting the log information of the pod with the name you found above.
kubectl logs initialize-spaceone-fsqen-74x7v -n spaceone

...
TASK [Print Admin API Key] *********************************************************************************************
"TOKEN_SHOWN_HERE"

FINISHED [ ok=23, skipped=0 ] ******************************************************************************************

FINISH SPACEONE INITIALIZE
Create the values.yaml file and edit the values. There is only one item that need to be updated.
For EC2 users: put in your EC2 server's public IP instead of 127.0.0.1 for both CONSOLE_API and CONSOLE_API_V2 ENDPOINT.
- TOKEN
console:
  production_json:
    CONSOLE_API:
      ENDPOINT: http://127.0.0.1:8081  # http://ec2_public_ip:8081 for EC2 users
    CONSOLE_API_V2:
      ENDPOINT: http://127.0.0.1:8082  # http://ec2_public_ip:8082 for EC2 users

global:
  shared_conf:
    TOKEN: 'TOKEN_VALUE_FROM_ABOVE'   # Change the system token
After editing the values.yaml file, upgrade the helm chart.
helm upgrade cloudforet cloudforet/spaceone -n spaceone -f values.yaml
After upgrading, delete the pods related to the namespace named spaceone. After upgrading, delete the pods in spaceone namespace that have the label app.kubernetes.io/instance and value cloudforet.
kubectl delete po -n spaceone -l app.kubernetes.io/instance=cloudforet
7) Check the status of the pods
kubectl get pod -n spaceone
If all pods are in Running state, the setup is complete.
Port-forwarding
Installing Cloudforet on minikube doesn't provide any Ingress objects such as Amazon ALB or NGINX ingress controller. We can use kubectl port-forward instead.
Run the following commands for port forwarding.
# CLI commands
kubectl port-forward -n spaceone svc/console 8080:80 --address='0.0.0.0' &
kubectl port-forward -n spaceone svc/console-api 8081:80 --address='0.0.0.0' &
kubectl port-forward -n spaceone svc/console-api-v2-rest 8082:80 --address='0.0.0.0' &
Start Cloudforet
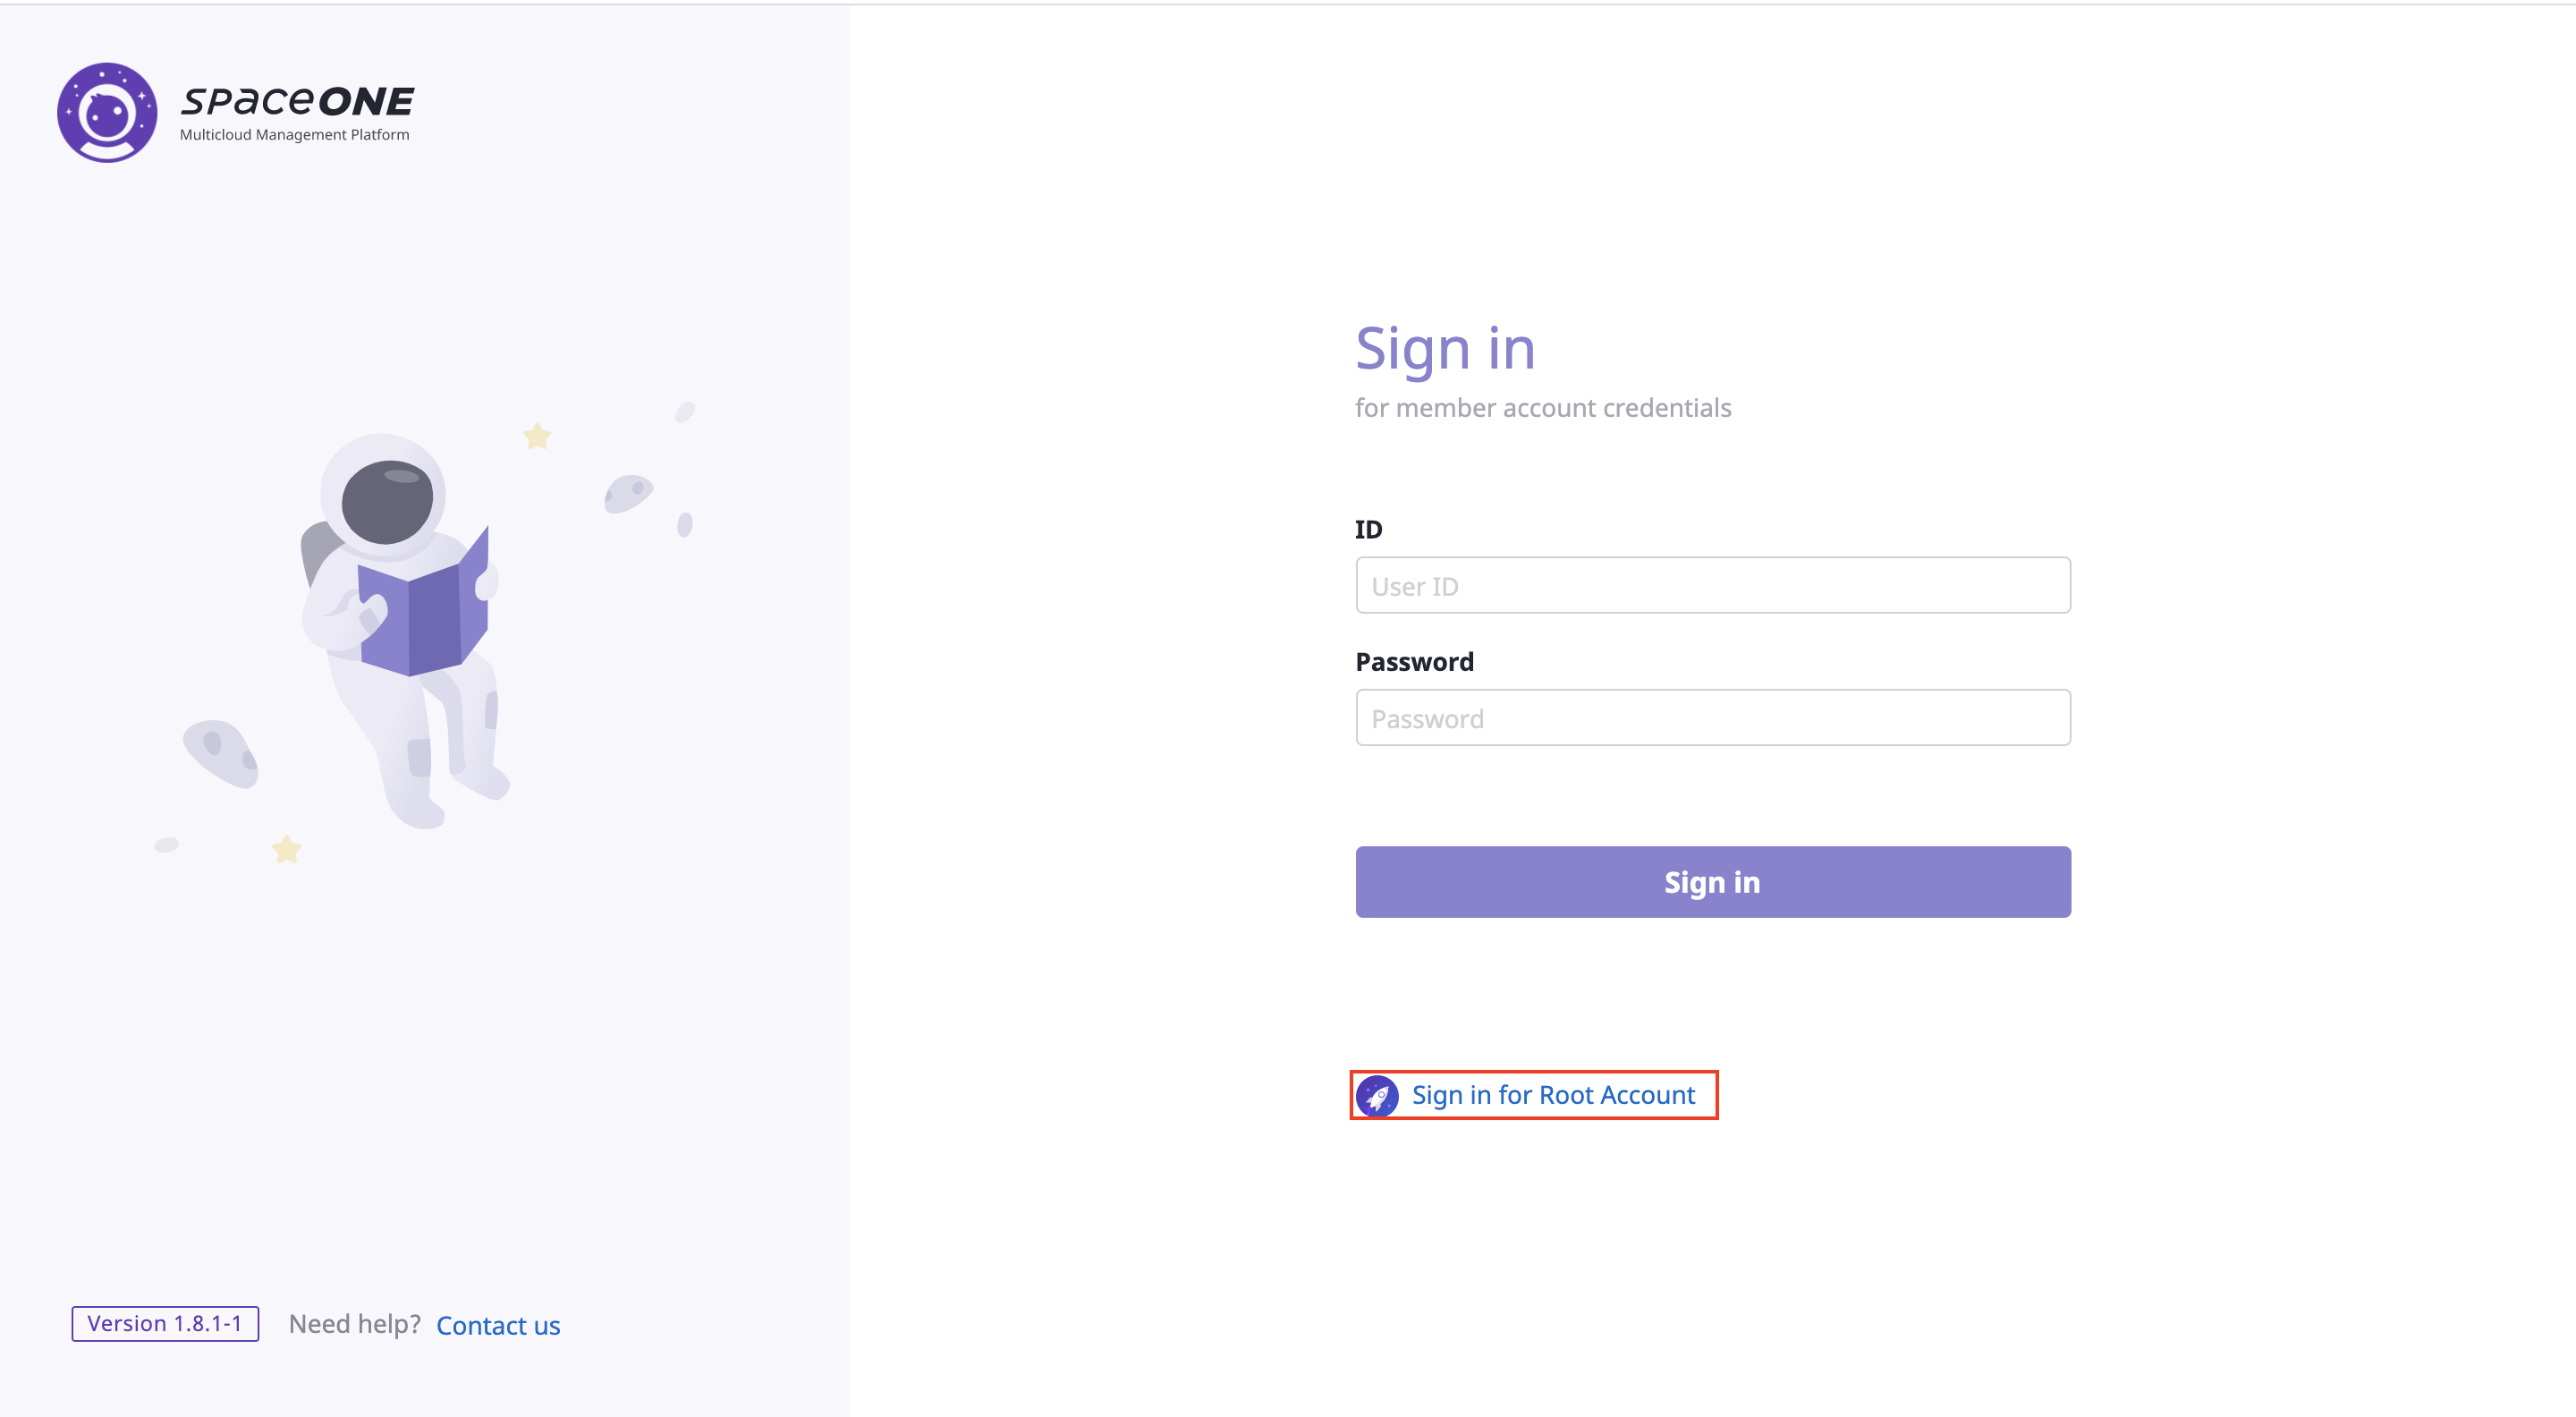
Log-In (Sign in for Root Account)
For EC2 users: open browser with http://your_ec2_server_ip:8080
Open browser (http://127.0.0.1:8080)
| ID | PASSWORD |
|---|---|
| admin | Admin123!@# |
Initial Setup for Cloudforet
For your reference, Cloudforet is an open source project for SpaceOne. For additional information, refer to our official website here.